Tuesday 31 October 2017

Use Excel to Get Updated Bitcoin & Altcoin price


Use Excel to Monitor Bitcoin & Altcoin price
This guide will teach you step by step on how to use excel to get updated Bitcoin & Altcoin price in the easiest way even though you are not an Excel Expert.
You just need to simply follow the below 2 steps:

1. Download Power Query to your Excel
2. Setup Excel and link to https://coinmarketcap.com/

1. Download Power Query to your Excel
Power Query is an amazing data tool for Excel!  It is built by Microsoft to help you import, transform, and automate your data processes.  
Here is a quick list of compatible versions:
  • “Free” add-in for Excel 2010 and 2013 for Windows.
  • Built-in feature for Excel 2016 for Windows. 
Complete Guide to Installing Power Query
This page will help you determine if you have the right version of Excel, and provide installation instructions.

Video Guide to Installing Power Query

What Version Do I Need?

The download page for Power Query lists which version of Excel are compatible with Power Query.

The following Office versions for Windows are supported:
  • Microsoft Office 2016 – All Versions
  • Microsoft Office 2013 – All Versions
  • Microsoft Office 2010 Professional Plus with Software Assurance
Both 32-bit and 64-bit are supported.  Power Query is not compatible with any Mac versions of Excel yet.
Unfortunately, if you don’t have these versions you will need to upgrade to use Power Query.  To me, Power Query is worth the upgrade to Office 365 alone, and there are a lot of other cool new features too.

How Do I Check My Version of Excel?

Excel 2010

Here’s how to determine your version and 32 or 64 bit in Excel 2010:
  1. Click the File button.
  2. Click the Help option on the left side menu.
  3. The Excel version will be listed under the Product Activated section.
  4. The bit version (32-bit or 64-bit) will be listed under the About Microsoft Excel section.
Excel 2010 Version and 32 or 64 bit
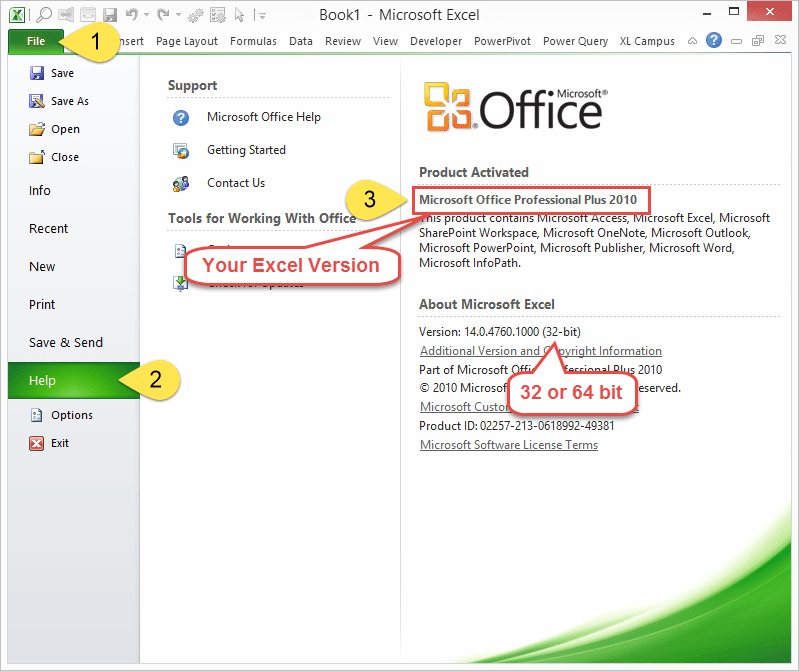
If your Excel looks like the screenshot above, then you are in luck! 🙂  Again, you will need the Professional Plus version of Excel 2010.
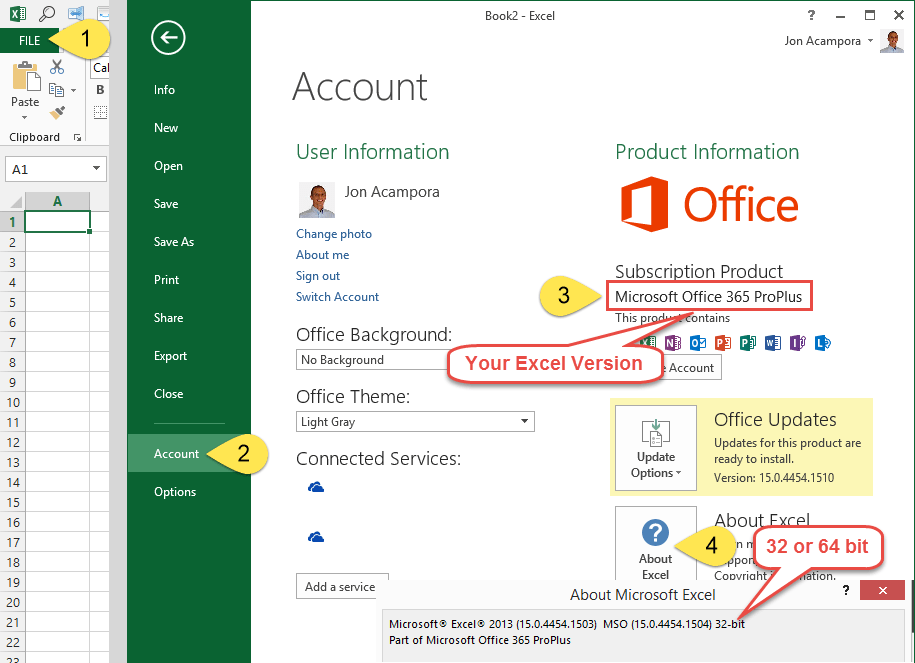
Excel 2013

Here’s how to determine your version and 32 or 64 bit in Excel 2013:
  1. Click the File button.
  2. Click the Account option on the left side menu.
  3. The Excel version will be listed under the Subscription Product section.
  4. Click the About Excel button.  The bit version (32-bit or 64-bit) will be listed in the first row of the pop-up window.
Excel 2013 Version and 32 or 64 bit

How to Install Power Query

Excel 2016

Power Query is included with Excel 2016.  It has been renamed and is now on the Data tab of the Ribbon in the Get & Transform section.
Power Query in Excel 2016 for Windows Data Tab of Ribbon Get and Transform
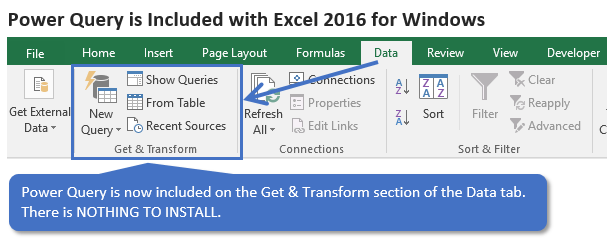
This means there is nothing to install.  If you are using Excel 2016, go to the Data tab on the ribbon and press the New Query button to create a query and open the Power Query editor.
It’s important to note that there are some differences in Power Query for different builds of Excel 2016.
If you are on the MSI (Windows Installer) version then you will not get frequent updates to Power Query.  Your ribbon might look different from mine, and you won’t have all the latest features.
If you are on an Office 365 subscription then you have the Click-to-run version and you should get all the latest updates.  
If you are on the ProPlus version of Office 365 then you might be on the Deferred Channel.  The name of the Deferred Channel has been changed to Semi-Annual Channel as of September 2017.  This means you get updates every six months instead of every month.
All the versions and channels make this very confusing, to say the least.  Hopefully this guide helps you figure out how to get Power Query for Excel 2016.
Excel 2010 & 2013
For Excel 2010 and 2013 you will need to download the Power Query add-in and install it.
The installation steps are about the same in Excel 2010 and 2013.
  1. Close (exit) Excel completely.
  2. Click the following link to go to the download page.
    http://www.microsoft.com/en-us/download/details.aspx?id=39379
    Power Query Download Page
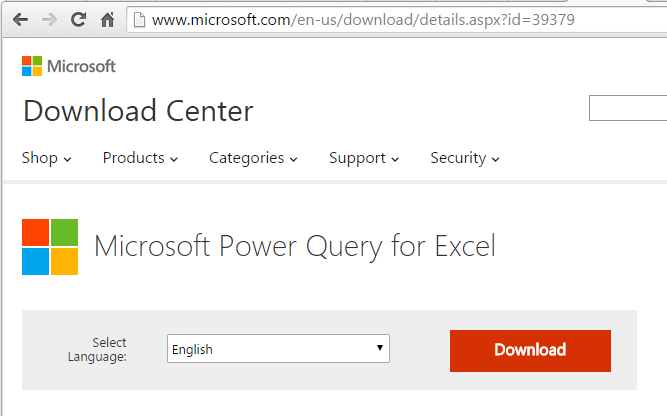
  3. Click the Download button.
  4. Click the checkbox for the bit version you are using.  Most likely you will be using 32-bit.
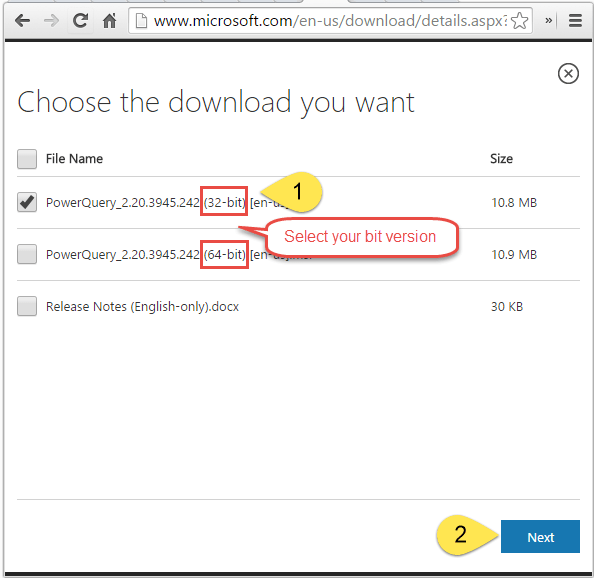
    Download Power Query Select Bit Version
  5. Click Next
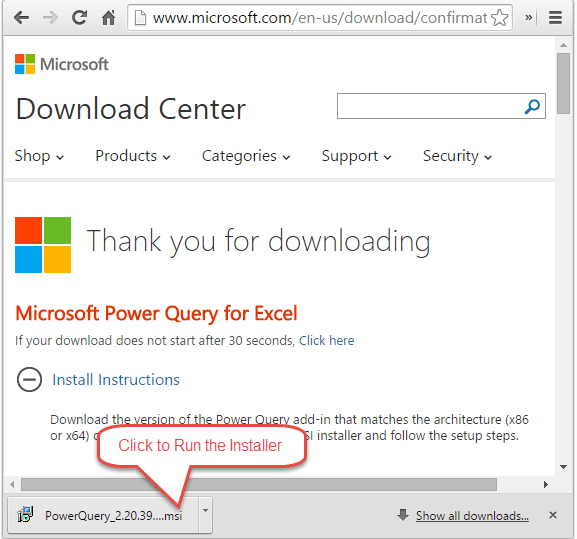
  6. The add-in installation file will download.  Click the file to run the installation.
    Power Query Run Installer
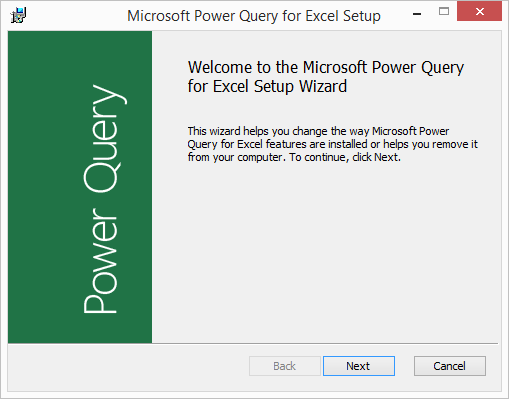
  7. The Setup Wizard window will open.  Follow the steps to install Power Query.
    Power Query Installation Window - Setup Wizard
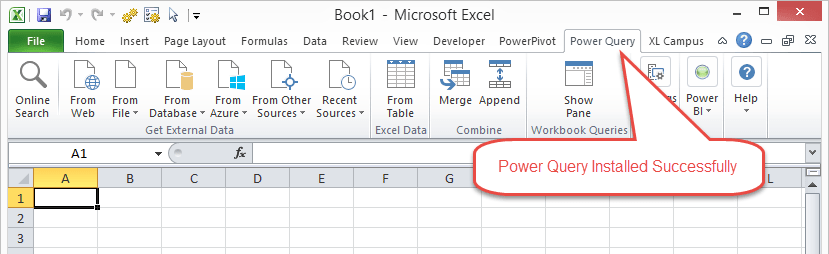
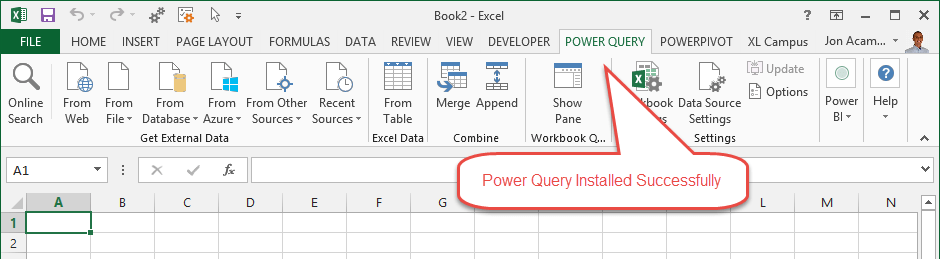
  8. Once the installation is complete, open Excel.  You should now see the Power Query tab in the Ribbon.
    Power Query Tab of the Ribbon Excel 2010Power Query Tab of the Ribbon Excel 2013

My Power Query Tab Disappeared

If your Power Query tab ever goes missing, you can usually re-enable the add-in by going to the COM Add-ins menu.
There are a few ways to get to the COM Add-ins menu.
  1. File menu.
  2. Click Options on left side menu.
  3. Click Add-ins on left side menu.
  4. Select COM Add-ins from the Manage drop-down.
  5. Click the Go… button
    Excel 2010 Options Menu for COM Add-ins
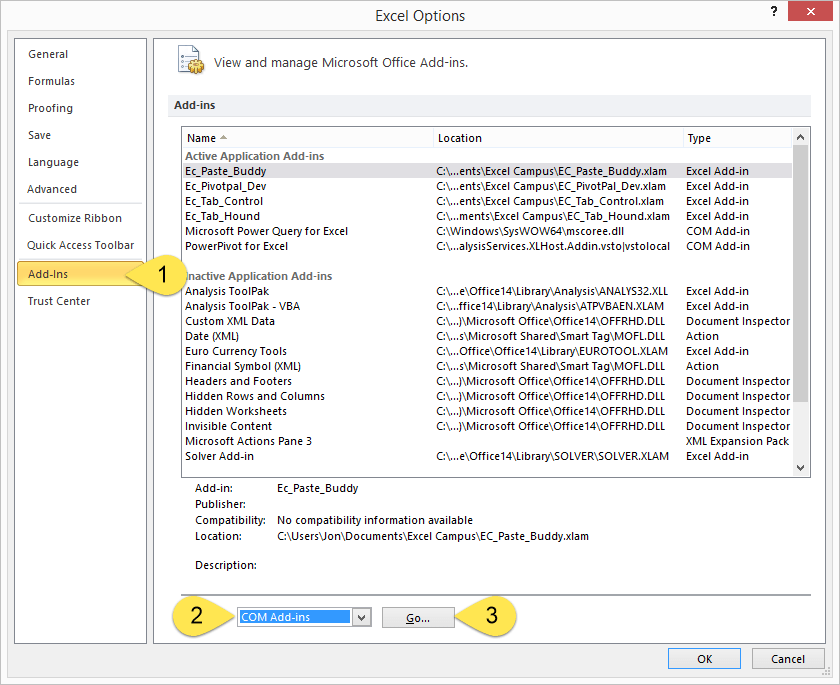
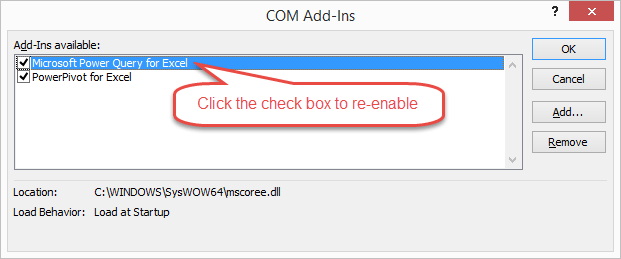
  6. That will open the COM Add-ins Window.  If the Power Query check box is not selected, just select it to reload the add-in.
    COM Add-ins Menu for Power Query
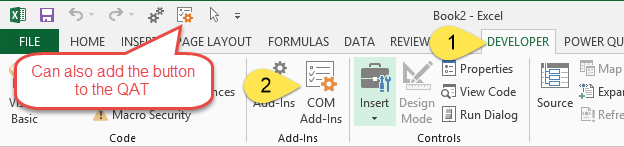
There is also a button on the Developer tab that will take you directly to this window.
COM Add-ins Button on the Developer Tab of the Excel Ribbon

2. Setup Excel and link to https://coinmarketcap.com/
  • Now, Open an empty Excel worksheet. Click on Power Query tab and then choose From Web.


  • The below will prompt out and then you need to choose Basic and paste https://coinmarketcap.com/ into URL. Finally Press OK.


  • Wait for a few seconds. The below will promp out. Click on Table 0.

  • Then, all the Cryptocurrencies prices will be listed as below. Click on Edit button.
  • The Query Editor will be Prompt Out
     You can see all the listed crytocurrencies in this view
  • Then you can either delete unwanted Column or just leave as is. To delete unwanted column, just right click on the column and choose remove. To get a clean view, i deleted most of it and left Rank, Price and 24h price change.

  • Then, you can filter which currency that you want to monitor. This will further simplify the template. Do it as below.

  • So, now you can see a simple template showing the information that you wanted. Click on Close & Load. this will load the information into your Excel.
  • You will see the Crypto price will be in your excel worksheet.
  • If you want to update the latest price, simply right click on the table and choose Refresh. The info will be updated according to the latest information on Coinmarketcap.


  • You are done with the Setup now. You can get latest Crypto price on you Excel with 1 or 2 clicks.
Now, With this Crypto info on you Excel Sheet, you can do some VBA or Excel Formula with it. I have done a simple one, to see my gain and loss on the holding Crypto. You can download the Excel from Google Drive. Click Here.


If you are not able to download, please leave comment with your email address, I will send to you.

Hope you enjoy ready. Happy Earning!!!!!☺☺☺

Donation

If you like this guide and would like to do a donation to me, you can donate to the below:

Bitcoin (BTC): 1CxXyr8XepnMWjBPFAERRg7sZNpmirFcZB

Ripple (XRP): rL12t8WFDHDF8QN4iUzC3jNU2WddYRCGk9

Monero (XMR): 44VxXWC2o713phf5otf35vJQ9UDJQgvf58WgAd7UPNsV5Aj33VyMhxu3gF1nzjnRx17aSENaoB9h8Bwr3u9cfJmdKnJM6bv

Thursday 26 October 2017

Monetize Your Blog with Amazon CPM Ads


Amazon is well known among bloggers for their affiliate program where you can advertise their banners or links in your website. In return for advertising, Amazon pays you commission for each sale made through your referral link or banner within 24 hours. You will earn a sum even if the person who clicked your link bought something that wasn’t advertised on your blog. For e.g., if the link they clicked was for a vacuum cleaner but they bought a laptop, you still get paid. Apart from their affiliate system, you can earn through Amazon CPM Ads as well.

What are Amazon CPM Ads?

First of all, CPM literally translates to “cost per mille” or in English, cost per thousand impressions. For instance, if the CPM rate is $1, you will earn $1 for a thousand impressions on your advertisement. If you get 100,000 impressions, you will earn $100. It’s as simple as that.
That’s how Amazon CPM advertisements work. They display their ads and you earn from each impression that you get. For now, they don’t have CPC (cost per click) ads like Google Adsense. Nonetheless, having CPM ads is a great opportunity to earn especially if you get rejected by other advertising networks.

How do you apply for Amazon CPM Ads?

Firstly, you need to have an account with Amazon Affiliates that is still active.
Next, look at your Amazon Affiliates dashboard.

If you noticed on the image above, there is a column for Amazon CPM Ads. This may or may not be inside your dashboard. When I first joined Amazon Affiliates, I couldn’t find for such CPM ads. If it’s already embedded inside your dashboard, it means you already qualified upon registration for Amazon Affiliates. However, if it’s not, you need to check with their support staff to see if you qualify.
I had to contact their support staff and requested for it to be added. After a few days, they have added it for me and I started using their ads not long ago. Lucky me.

Once you click on it, you will see “Introduction”, “Home” and “Create New Ad Code”. Click on the “Create New Ad Code”.

After clicking, you will get to this page.
What should you do next?
  • Choose a name for your advertisement which is mainly for your own reference (so that you know which of your ads are performing well).
  • There are five different ad sizes, pick one which is suitable for your blog. No worries, you can create more ads later.
  • Choose your target CPM. Personally, I chose $1 as my target CPM.
So how does it actually work?
CPM rates depend on my factors, including where your audience is from and what your blog niche is. This means that some visitors are only “worth” lesser than $1 CPM and others may be worth $1 or more.
For example, assuming that your target CPM is $1, if your visitor is worth less than $1 CPM, Amazon won’t display their ads. They will only display ads if your audience is worth $1 or more.
Does this mean that my ad space will be empty?
Luckily, Amazon allows you to put a passback ad code, which brings us to the last part.
  • Provide your passback ad code. This means that they allow (or rather, force) you to put codes from other advertising agencies, such as Adsense, Media.net or anything else. If their CPM rate is not met, they will pass the ad space back to your other advertising network.

For example, if you put an Adsense code as your passback code, it will display Adsense ads if your targeted CPM rate is not met. You can even put their own Amazon Affiliates banner as the passback code. That’s what I did for this blog initially (until I changed to my hosting affiliate banner).
Once you’ve created your ads, you can insert it into your blog. I will use WordPress as an example.

How to insert Amazon CPM Ads into a WordPress blog

Inserting CPM ads into your WordPress blog is quite simple. If you have a sidebar, you can just go to your widgets, and add a “Text” widget.


As you can see in the image above, just copy and paste exactly the Amazon ad code into the text widget and it works. The method of adding Amazon ads is the same as inserting ads from other networks.
If you want to insert the ad code into a header or a footer, and if you’re using a self-hosted WordPress, go to “Appearance“.
Next, click on “Editor” and you will be directed to this screen, which is the html part of your blog.

On the right hand side, you will notice “header.php” which is for your header and “footer.php” which is for your footer.
If you want to add the code into your header, click “header.php”. You will see all kinds of coding. Find the opening <body> tag which might look like this: “<body <?php body_class(); ?>>“. Insert the ad code after this tag, on the next line.
You can use the same method for footer ads, by going to “footer.php” and doing the same thing.

If you’re not familiar with html, don’t risk it. You can just install and activate the Ad Inserter plugin, and you can choose where you want the ads to be inserted to. It can be at the header or footer or even in between paragraphs and so on.
Now that we’ve finally gotten this out of our way, let’s go back to the main question which is the topic of this post.

How much can I actually earn from Amazon’s CPM Ads a month?

As I’ve mentioned in the beginning of this post, you can set a targeted CPM rate and you can basically guess how much you’ll earn for a thousand or a hundred thousand impressions.
Having said that, you have to take into account “ad fill rates” as well. This means that even if 1000 visitors came to your blog this month, not all 1000 will view the ads, as it’s impossible to display ads to all visitors. This happens because of network errors, timeouts or even if a visitor leaves the page early. Furthermore, not all of your visitors will reach your CPM rate. It could be your blog niche which commands a low CPM as well.

If you can see in the image above, I’ve earned $0.26 for 237 ad impressionswith the CPM rate of $1.11. That is the average CPM rate that I’m getting from my visitors, although I’ve set my targeted CPM rate as $1 only.
Just to clarify, it doesn’t mean that if you set your rate as $1, you will only earn $1 for 1,000 views. It just means that it displays ads to visitors with a CPM rate of $1 and above.
What about the fill rate?

If you can see on the image above, my fill rate is really low, i.e. around 3 – 9% only. If I’m not mistaken, fill rate is calculated by dividing impressions with ad requests. Ad requests are the number of times Amazon ads are requested from their server to display on your blog. Although they were displayed, they were not viewed by visitors most of the time, which results in low ad impressions.
The best way to improve ad impressions is to perhaps put ads in obvious places. “You don’t say“. Most of my ads are hidden in footers or in sidebars which are rarely viewed. Not everyone reads all the way to the end, which means a majority won’t see my footer ads. Furthermore, mobile visitors won’t see my sidebar if they read my articles, unless they purposely click the sidebar button.
Nevertheless, I’m not depending much on my Amazon CPM ads, as I’m focusing more towards affiliate sales currently. Putting too much ads at the beginning might adversely affect user experience.
Furthermore, Amazon only allows three CPM ads to be displayed at a page one time. Your account might get suspended if you use more than three different ads on a page.
Back to the topic. Are Amazon CPM ads really effective for new bloggers? Unfortunately, it may not be very effective as you won’t earn much in the beginning for the simple reason that new blogs generally don’t get much traffic (unless you’re an exceptional case). Even if you get 1,000 ad impressions, you’ll probably only earn $1 or slightly more.
This doesn’t mean that Amazon CPM ads are terrible. They are actually better than other CPM ads that I’ve tried and if you get lots of traffic each month, it becomes a source of passive income. Who doesn’t like passive income? Furthermore, they work well with Google Adsense or other advertising networks as well since it allows passback whenever CPM rates are not met.

Conclusion

Amazon CPM ads are quite useful as a source of passive income especially if you’ve failed to get approval with Adsense or other networks. As a new blogger, you won’t earn much but it’s better than saying that your blog is earning zero.
Putting ads on your blog is not the best way to monetize a blog with minimum traffic. If your blog is not getting many visitors, you can probably earn more by way of affiliate marketing. You can use their CPM ads and insert their affiliate code as passback to maximize your potential income.

Best Bitcoin Faucet


The easiest way to earn free Bitcoin and Altcoins is via Faucets.


Bitcoin faucets are a reward system, in the form of a website or app, that dispenses rewards in the form of a satoshi, which is a hundredth of a millionth BTC, for visitors to claim in exchange for completing a captcha or task as described by the website. There are also faucets that dispense alternative cryptocurrencies.

However, the most annoying part is you will need to accumulate a certain amount of BTC before you can make a withdrawal to your wallet. Here come in the microwallet to solve this problem. The faucets can send the BTC to your microwallet so that you can accumulate the BTC faster in microwallet from multiple faucets.

One of the most popular microwallet is Faucethub which can provide your withdrawal to reach your BTC wallet within 24hours. It has a list of Faucets for your choice. Below are the most easiest claim faucets which i have been using. Remember to register Faucethub before you can claim the faucet.

The below are the faucets that I filtered out which is the most profitable.


Starbits
Claimbits.win
Fautsy
Gobits
Claimbits.io
Fanbit
Kickasstraffic

Complete all these 7 faucets take you 5min and you can get around 300 satoshi. Then repeat again and again. You can simply earn upto 10000 satoshi like I did.


HOW TO USE FAUCETHUB / FAUCETHUB GUIDE:

Faucethub is a microwallet service which essentially helps users and website owners store funds and transfer funds to each other in a secured way without going through the process of blockchain which uses fees for each and every transfer. The owner is a great guy and very active and helpful. The support team and moderators deserve the same reputation also. If you have still not opened up an account in Faucethub, you are losing out on too much bitcoins.
Using Faucethub is easy, but new users or beginners stumble on the first step. In this very short guide I will tell you exactly how to do start with it and what you need to do. 

REGISTRATION PROCESS:
You do it as you will with any websites. The only thing you need in addition is a bitcoin wallet address. If you still do not have it. See how to get one here.
Connecting your account:
In Faucethub, you need to connect your present bitcoin address. What happens is this:
There are several sites that pay to Faucethub account. What it means is Faucethub generates an address of itself corresponding to the bitcoin address that you add to your Faucethub account. So, when these sites pay, they pay to the corresponding address that you have with Faucethub. All these goes on in the background and you won’t see it. When a site asks you to put in your “Faucethub Account” It means that you put in the same address (bitcoin wallet address / litecoin wallet address / dogecoin wallet address) that you have linked with your Faucethub.
HERE IS AN EXAMPLE TO MAKE EVERYTHING EASIER:
Suppose your bitcoin wallet address is : XYZ123
In Faucethub you add this address.
Now, when a site tells you to put in your Facuethub address, you put in XYZ123.
When the site sends you bitcoins you will get bitcoins in your Faucethub address XYZ123.
You do not get your bitcoins in your bitcoin wallet address XYZ123. For that, you need to withdraw your funds from Facuethub account to your bitcoin wallet address.
For withdrawing your funds, you need to go to your Faucethub account and then withdraw to your bitcoin address XYZ123.
If you have many other bitcoin address such as: ABC123, DEF123, UVW123 and you put any of these address in the sites that ask for your Faucethub address, you won’t get the funds in your bitcoin address since these addresses are not linked to your Faucethub account.
You can link multiple addresses to your Faucethub account.
Linking an address to your Faucethub account:
Once you signup and login, you will see your dashboard by default. Click on the tab “Wallet Addresses” Then below you will see a space to put in your wallet address that you want to link to Faucethub.

Faucethub deals with Bitcoin(btc), Litecoin(ltc) and Dogecoin(doge) cryptocurrency systems. So, after putting your wallet address, you have to select the type of currency it is “btc/ltc/doge”.
Then just below click the “Link This Address” button.
Now you are done.

I’m not going to explain all what you can do in the site as those are pretty self-explanatory and will be a waste of your time. Search the tabs, and read the help and FAQs. Before using chat read the chat rules on the “?” button just above chat.
Faucethub allows you to earn from faucets, games, Chat, offers and surveys, click on ads etc, and your earnings are added to your Faucethub address. Being active on Faucethub chat also gives you a chance to get satoshis from the uncountable users with a big heart who decides to rain. The default rain is caused by Faucethub “rainmaster”. “Rain” is actually the act where users / Faucethub tips multiple other users and is a way of conveying appreciation or just saying “thank you”. Faucethub also has a website dedicated to getting sure rains for visiting faucets. Got to it (Rainpool) from here, or (read first on how to use rainpool on my rainpool guide by clicking here).  You can also open a faucet for yourself at Faucethub too and the process is very simple and well explained.
Hoping you best of luck with Faucethub!

Now you can start to claim BTC from the below faucets

The below are the faucets that I filtered out which is the most profitable.


Complete all these 7 faucets take you 5min and you can get around 300 satoshi. Then repeat again and again. You can simply earn upto 10000 satoshi like I did.

Donation

If you like this guide and would like to do a donation to me, you can donate to the below:

Bitcoin (BTC): 1CxXyr8XepnMWjBPFAERRg7sZNpmirFcZB

Ripple (XRP): rL12t8WFDHDF8QN4iUzC3jNU2WddYRCGk9

Monero (XMR): 44VxXWC2o713phf5otf35vJQ9UDJQgvf58WgAd7UPNsV5Aj33VyMhxu3gF1nzjnRx17aSENaoB9h8Bwr3u9cfJmdKnJM6bv